Free Printable Easter Party Collection

Click to download the PDF

Just a quick reminder to our readers that haven’t seen this in our Free Printables section yet, we have a FREE Printable Easter Party Collection available to download HERE. Or you can click the photo to the right to download directly from there.

This Free Printable Easter Party Collection contains the following items to ensure your table is perfectly appointed.

We’ve included:

  • Large and Small Decor Tags
  • Cupcake Wraps
  • Egg Decor
  • Chocolate Bar Wraps
  • Treat Bag Labels
  • Invitation
  • Decorative Papers
  • Napkin Rings / Bottle Wrappers

Choose what you need and download and print at home to complete your Easter Party Decor this year!

Our collection includes the designs all on 8.5x11” sized PDF files for you to print at home!

Sweet Recipes: Citrus Cake, A Love Story

Last year I fell in love with a cake. June 14th, 2011.

There you are browsing Pinterest for the 3rd hour in a row when suddenly it smacks you in the face. Cake LOVE. A beautifully photographed and presented cake, for your viewing pleasure. The kind that makes you want to reach on in and grab a slice, if such thing were at all possible. Have you even had this happen to you? Well of course I pinned that sucker right then and there and have since been drooling over it.

Of course I never got around to making it. That is until we settled on a summer Citrus Brunch Celebration and started planning our menu. Then out came my “Cakes” board and the Citrus Cake was re-pinned to our “Citrus Brunch Ideas” board. It was finalized. This cake was going to happen. In my kitchen.

My cake love came at the hand of one Apollinas and her fashion inspired blog. About her cake inspiration she writes: “Those spring Stella McCartney prints we have all been seeing look delicious enough to eat.  So, now you can - in the form of cake…!”

Enough talk of my cake love though, here is the recipe we adapted from Apollinas.

Citrus Cake with Orange & Lemon

Ingredients

  • 2 sticksunsalted butter, at room temperature
  • 2 1/2 cups all-purpose flour
  • grated zest of 2 oranges
  • grated zest of 2 lemons
  • 1 1/2 tsp baking powder
  • 1/4 tsp baking soda
  • 1/2 tsp salt
  • 1 1/2 cups granulated sugar
  • 2 tsp vanilla extract
  • 3 eggs, room temperature
  • 1 cup milk
  • Non-stick baking spray
  • Parchment Paper, cut to fit the bottoms of your baking pans.
  • Assorted citrus fruits, sliced and drained to decorate with.
  • Fresh mint leaves, for decoration.

Directions

  1. Heat your oven to 350°F and prepare two 8″, 9″ or 10″ cake pans. I prefer to use Pam for baking, and spray the pans generously, then line the bottoms with parchment paper and spray again. I find it is easier than buttering and flouring. 
  2. Whisk together the flour, baking powder, baking soda, and salt in a bowl, then set it aside.
  3. With an electric mixer, beat the butter and sugar on medium-high until fluffy, 2 - 3 minutes.  
  4. Add the grated zest of the oranges and lemons.  
  5. Add the vanilla.
  6. Add the eggs one at a time, scraping down the sides if needed.
  7. Reduce speed to low, then add the dry mixture and the milk, alternating a little of each, and ending with the dry. Mix this until just until combined, and take care not to overmix.
  8. Divide the batter equally between the prepared cake pans, leveling the top of each with a large spoon or rubber spatula.  
  9. Bake until a toothpick from the center of the cake comes out clean, 25 to 30 minutes for 8-inch pans, 22 to 25 minutes for 9-inch pans and 20 to 22 minutes for a 10 inch pan.  
  10. Cool the cakes in the pans for 15 minutes, then turn out onto racks to cool completely.

Citrus Curd Filling

Ingredients

  • 4 large eggs
  • 1 cup sugar
  • 1 tbsp grated lemon zest
  • 1 tbsp grated orange zest
  • 1/4 cup fresh lemon juice
  • 1/4 cup fresh orange juice
  • 1 stick unsalted butter, sliced

Directions

  1. In a stainless or glass bowl, whisk together the eggs, sugar, zests and juices. 
  2. Add the butter, then set the bowl on top of a saucepan of simmering water.
  3. Cook the curd, whisking constantly, until the mixture has thickened, about 15 minutes. 
  4. Pour into a medium bowl.  
  5. Cover and refrigerate until completely cool, about 2 hours.

Fresh Orange Lemon Buttercream

Ingredients

  • 4 sticks unsalted butter, at room temperature
  • 2 tablespoons finely grated lemon zest
  • 2 tablespoons fresh orange juice
  • 4 cups of powdered sugar

Directions

  1. Beat the butter in your electric mixture until light and fluffy. 
  2. Reduce the speed to low and add the orange juice and zest.
  3. Add the sugar a cup at a time, waiting until one is fully in corporated before adding another.
  4. Resume a medium-high speed and beat the buttercream until it is smooth and fluffy.
  5. Store at room tempurature until you are ready to ice the cake. (Up to 2 days in an air-tight container.)

Assorted Citrus Fruits & Mint Leaves

Chose which citrus fruits you want to feature on top of the cake.

Slice them thinly and pat dry with a paper towel before laying them on top of your cake.

Pluck your mint off the sprigs and scatter about the cake between your citrus slices to add a bit of greenery. We also added in a bit of sage as well for color around the base of our cake.

Please try this recipe and come back and let us know your thoughts!

Or share with us a cake you fell in LOVE with!

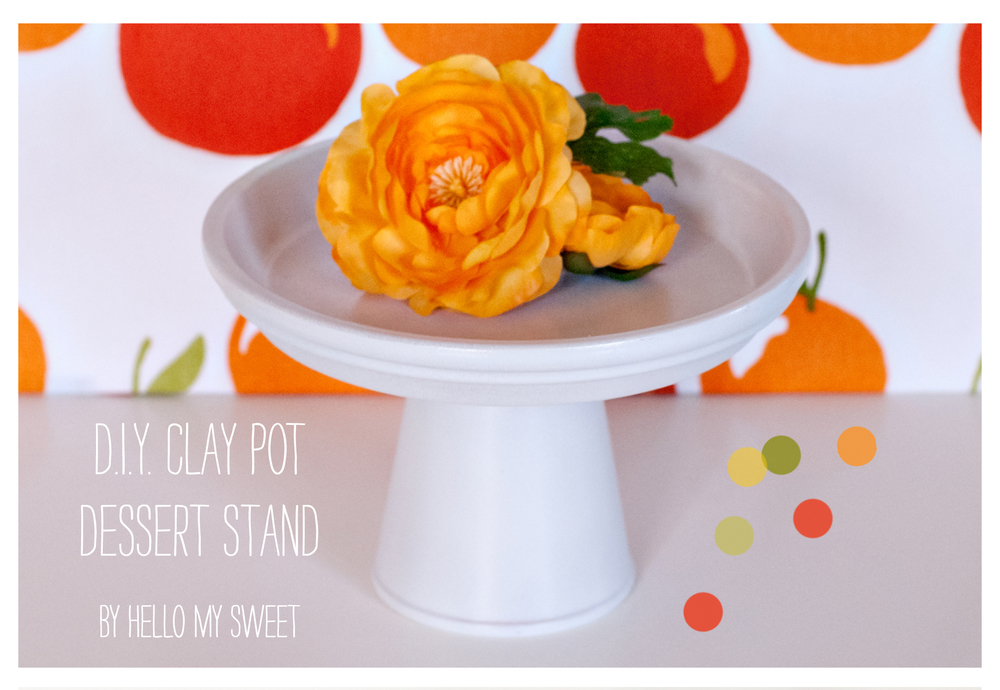
Sweet DIY: Clay Pot Cake Stands

Good afternoon fellow crafty people!

We have an awesome and easy tutorial on creating your own Dessert & Cake Stands today!

As you already know we are all about budget partying, so it should come as no surprise that we have decided to use some very common and inexpensive materials for this project. This stand is simple to make and of course VERY inexpensive. Just a couple of simple clay pots and saucers in different sizes and you could have an entire set of serveware for your own party or dessert table display.

Ok here we go!

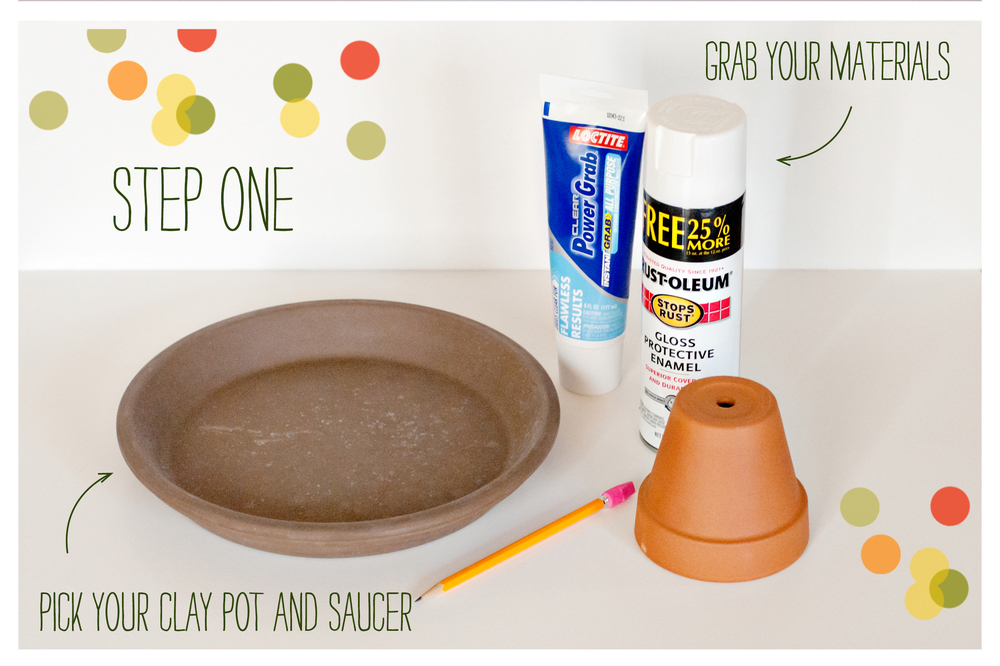
Here is a list of the materials that you will need to make your own “Clay Pot Dessert Stand(s)”:

  • Loctite Adhesive (super heavy duty for porous surfaces like clay)
  • Pencil
  • Clay Pot
  • Clay Saucer
  • Decorative Material to finish (We used spray paint, but you could be as creative you want of course!)


Step One: Choose a small clay pot and a large saucer. We found that the darker clay versions (as pictured) work better as far as paint coverage is concerned. The orange clay tends to show cracks when you paint it. The larger the saucer you choose the larger the pot underneath should be to make sure it can support properly. You want these to be nice and sturdy!


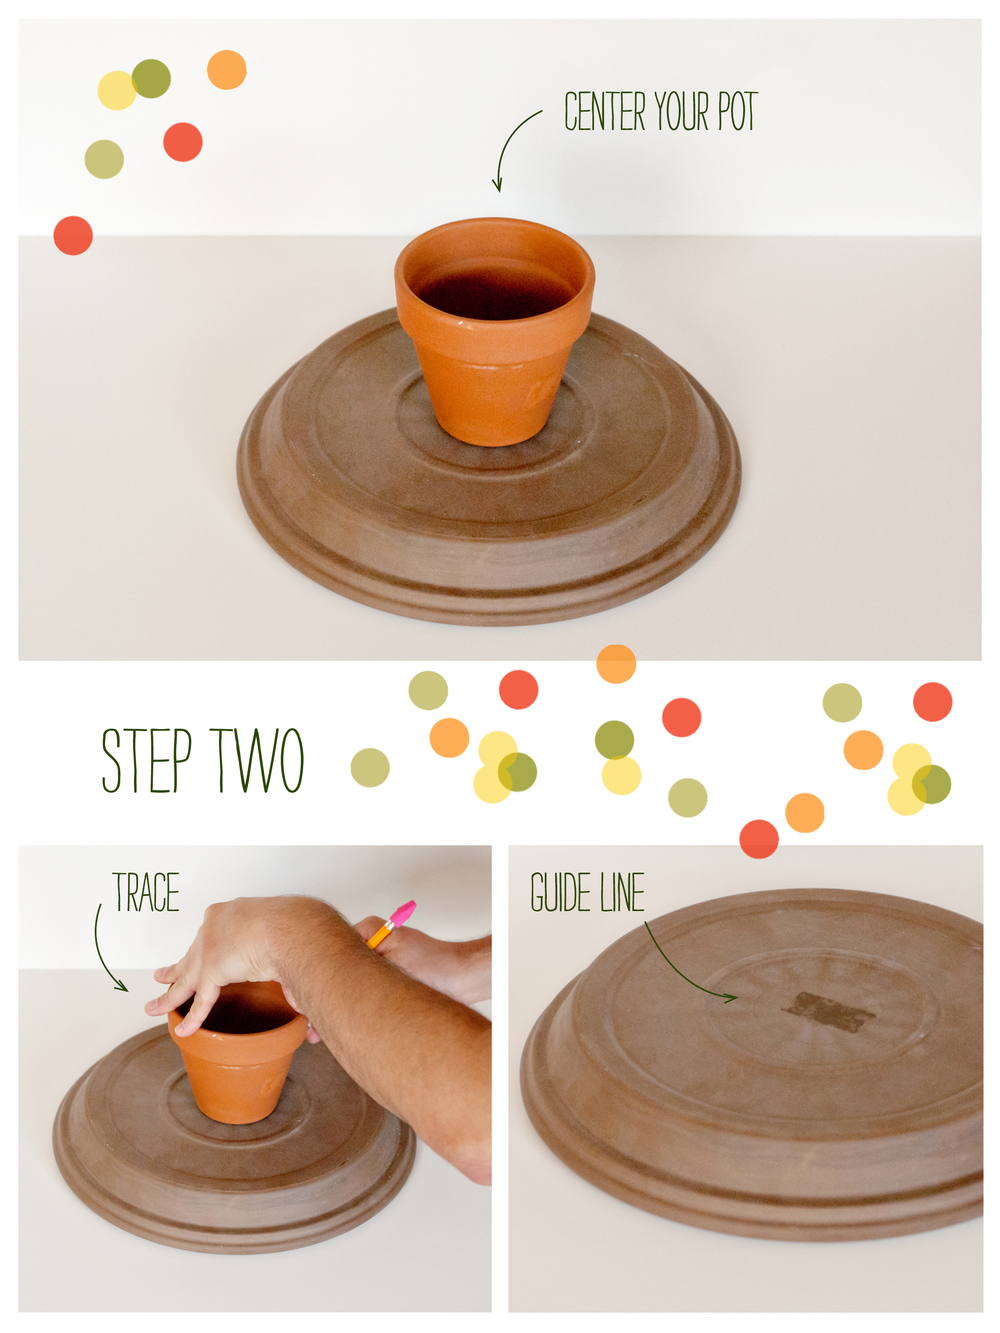
Step Two: Flip your saucer over bottoms up and place the base of the small clay pot on the center of the saucer. Trace the bottom of the pot outline onto the saucer and remove.


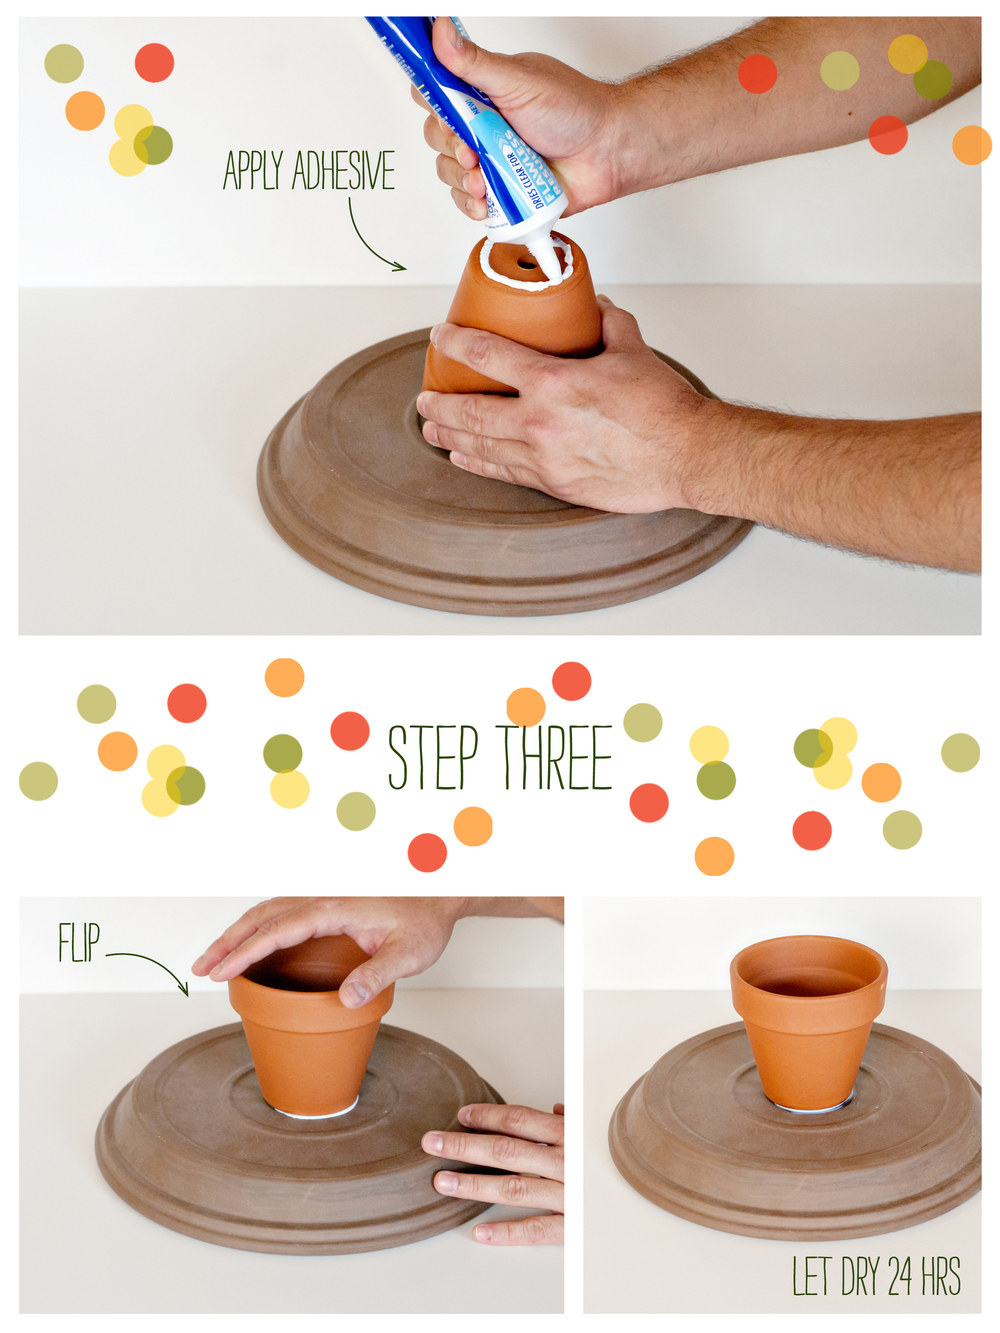
Step Three: Carefully apply your Locktite adhesive to the bottom of the clay pot, taking precautions to keep your glue inside the rim. Flip the pot over and place it inside the traced area on the saucer to secure in place. Let sit for 24 hours to completely dry before you flip it over.


Step Four: Now it is time to decorate your stand. Go ahead and flip it over and admire your handiwork. We chose to take a can of glossy white spray paint to our because we wanted something neutral that we can use over and over. The sky really is the limit here though, you could glitterize it, modge podge collage it, spray it, paint or stencil. It’s up to you!

Congratulations!

You now have your very own Clay Dessert & Cake Stand! These are really nice because they weigh quite a bit and are sturdy. If you plan to put food on your stand be sure to use a food safe base of parchment or paper underneath to keep the food from touching your decorated area. You could also apply a coat of food safe polyurethane spray and not have to worry about it!

Have you tried this technique before?

Leave us a comment below!

If you tried this out end enjoyed it, please pin us to Pinterest and share the DIY love!


Sweet DIY: Stretched Canvas Art

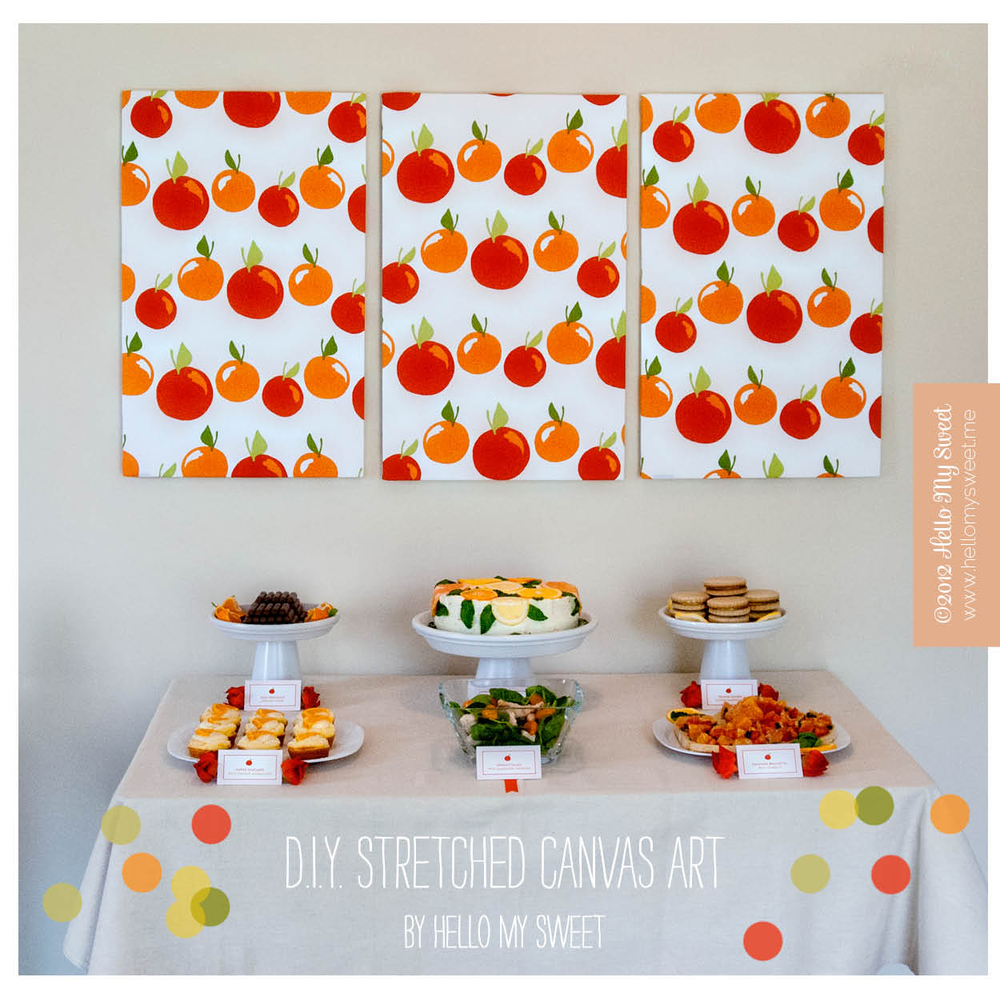
Today we want to show you how easy it can be (and inexpensive of course) to create your own Stretched Canvas Artwork. In our example you see that we used three of these pieces to create a modern and symmetrical backdrop for our Citrus Brunch buffet. However, you are not merely limited to backdrops, oh no, no. This technique could be used to beautify any space with stretched canvas art.

I personally was really excited with the results of this little experiment. So much so that we plan to use these in our kitchen now as wall art! I may even use one as a pin board as well for notes and reminders and such. Since the frame is backed with foamcore, it is perfect for push pins or straight pins.

We are going to demonstrate for you how to build a frame and stretch the fabric across it. Ours had specific dimensions due to the fabric we chose, which were actually a 3-pack of kitchen towels from Target. So they were already sized and we built our frame to accomodate that size. However you could pick any fabric you want and make your frame any size you want as well, using our technique as a guide. Take notice that NO NAILS or MITRE BOXES are required for this project. Super duper easy.

Step One: Lay your foam core down onto the fabric you chose. Adjust so that the foam core rests on top of the fabric with at least 1” of fabric extra on each side. Then cut the excess fabric away. You should now have a piece of fabric with 1” or more overhang all the way around each side of the foam core.

Step Two: Measure the width and height of your foam core. Mark your wood strips accordingly so that you have two pieces to cut as your width. Subtract two inches from your height measurement and mark two more pieces to cut at that final measurement as well. Cut your wood pieces. Our foam core is 16”w x 24”h, so we had two wood pieces at 16”w and two wood pieces at 22”h. (See photo for example.)

Step Three: Assemble your frame by laying our your wood pieces on top of the back side of the foam core. Lay your width pieces down first, they should stretch equally from edge to edge of the foam core at the top and the bottom. Then lay your height pieces down, they should meet up with the top and bottom pieces you already have and fill in the gap on the left and right sides of the foam core, completing the frame. Once you have everything as it should be, secure it in place with your loctite adhesive. (Photo example #1 below.)

Step Four: Place your fabric wrong side up and place your finished frame on top, wood side up, foam side down. Position it as you did when measuring in Step One. You should have your frame centered with at least 1” of extra fabric on all sides. (Photo example #2 above.)

Step Five: Using your staple gun to secure it, careful pull your fabric tight over the center of one side of your wood frame and staple it there. Do this for all four sides, stretching your fabric carefully and evenly and tightly across the frame, secure it with one staple. (Photo example #3 above.) You should now have your fabric secure to the frame. Proceed by stapling the sides the rest of the way, working from the stapled center point out toward the corners on all sides, leave the corners for last. When you are ready to finish the corners, tuck the excess fabric in on the sides, then pull the corner tightly toward the center of the foam core and staple to the wood frame. (Corner detail example below.)

Step Six: (Optional) You can add a picture hanger to the top of your frame to make hanging easier. 

Well there you have it! Stretched Canvas Art without a hammer, nails or mitre box. (Jason is pretty genius right?) Imagine the possibilities. I bet you’ll never overlook that awesome fabric pattern online or that cool vintage patterned table cloth you spotted again. Now you have a reason to take them home and make them into your own wall art!

The added bonus here, that I mentioned earlier already, is that you could use these as pin boards as well. In fact I have one above my desk that we made in similar fashion that I use as a french message board. We added two extra things for that, a layer of batting between the fabric and foam core, and ribbons interwoven on the front side.

Tell us what you think! What do have lying around just waiting to be made into canvas art?