
So now that you know how to create a colorful and festive Peacock & Golden Holiday Dessert Table, it’s time to fill it up with goodies! Jason and I generally fall into two distinct roles when we design a table. He is very much the meticulous planner of the decor, while I am in charge of the baking and anything that needs to be created for our printable sets. That wasn’t the case this time however.
Read MoreRetro 20's Style Golden Glam Peacock Dessert Table
I feel the need to share this little tidbit of (mostly) useless information. When I first discussed the idea of basing one of our Birds of a Feather themed holiday tables on the Peacock, I thought I was talking about the entire species of avian that is most associated with its bright colorful plumage…and NBC. But low and behold, every time we say the word “Peacock” we are actually only talking about the male of the species. According to our go-to tool and bastion of truth (yes I’m talking about the interwebs) you would actually be referring to Peafowl. I submit proof to you that the saying, “You learn something new every day.” is still pertinent.
These curtain panels, which are in our living room as I type this are the main reason why I wanted to do a Peaco…Peafowl themed dessert table. When we first saw them on the Pier 1 website, we loved the look of them. Most notably the royal blue hue, and the simple but elegant pattern of Peafowl feathers. When we arrived to purchase said curtain panels, we were surprised to see that they were actually a deep almost iridescent teal color. Surprised…yes, but still very happy, we purchased them anyway. I kid you not, while researching links and pictures for content for this post, I re-read the description for the curtains…“shimmering blue-green base with peacock feather prints.” Blue-Green. Must have missed that part the first time around…funny how things turn out, huh?
These curtain panels, which are in our living room as I type this are the main reason why I wanted to do a Peaco…Peafowl themed dessert table. When we first saw them on the Pier 1 website, we loved the look of them. Most notably the royal blue hue, and the simple but elegant pattern of Peafowl feathers. When we arrived to purchase said curtain panels, we were surprised to see that they were actually a deep almost iridescent teal color. Surprised…yes, but still very happy, we purchased them anyway. I kid you not, while researching links and pictures for content for this post, I re-read the description for the curtains…“shimmering blue-green base with peacock feather prints.” Blue-Green. Must have missed that part the first time around…funny how things turn out, huh?

A year later when we moved to our current location, we decided to put up the panels in our new living room. They were previously pulling duty as our master bathroom shower curtains. We had an oil-rubbed bronze thing going on in there, and we really wanted something with a punch of color. These things practically assault your eyeballs, but in a good way. You’ll see. I personally had ambitions of doing some DIY projects to help co-ordinate and tie-in some of our other décor in the living room with our “new” curtains. That is when I went to our Lowes store in search of swatches to color match some paint. I had 2 of our 3 children with me, who are infinitely experienced in distracting you from what you originally went to the store for in the first place. A skill a child comes pre-programmed with. Regardless, I believe I left with perfect matches. From the Valspar line of paint; 2009-2 Caramel Cream, and from the American Tradition by Valspar line; 5011-8 Classic Teal and 3010-3 Heraldic Gold.
 2009-2 Caramel Cream
 5011-8 Classic Teal
 3010-3 Heraldic Gold
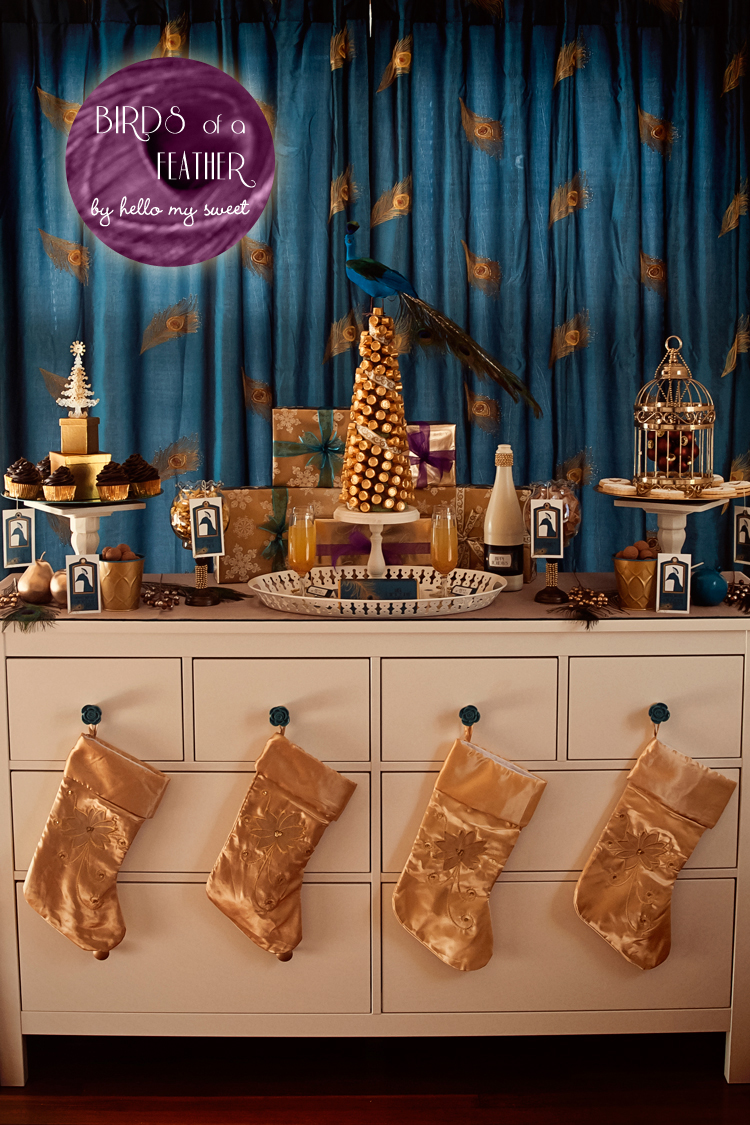
 Ok here it is, the low down on the deals we found! For the rest of the props, of what would become our interpretation of a Retro 20’s Golden Glam Peacock Dessert Table, I did the usual searching and scrounging at our regular haunts. From Kroger, gold and teal jewel toned chargers ($1 each) that would serve as platters for some tasty treats. At our local Wal-Mart Supercenter, I was able to score the 2nd (of 2 great fabric finds) bolt of fabric ($5) that was like a bazillion yards long. I also found the purple and teal sheer and gold/white grosgrain ribbon from the crafts section at ($1 each). Jo-Ann Fabrics yielded a styrofoam cone ($7) for the awesome Rolo centerpiece, small golden holiday bells ($1), and gold beaded garland ($1). At Target’s dollar section I was able to find, almost hidden from me on the very bottom-most shelf, two golden colored metal buckets. Great as is, but even better after just tweaking them a bit with some turqouise spray paint.

In what seems to be the case as of late, the majority of our props have come from an unusual location. At the start of the holiday season, Dollar Tree’s trim-a-tree décor was a literal treasure trove for our gold, teal and orange color scheme. It was there we found our champagne flutes, artificial fruit (spray painted gold and teal), 2 styles of gold gift wrapping, clear fluted edge votive candle bowls, bronze candle holders (turned into stands) and shiny gold gift boxes. Everything obviously only a dollar each there. For the wrapped Christmas gifts behind the center piece, we just used some empty cereal and fruit snack boxes. I was also able to utilize some of our old stand-bys like my custom made DIY cake stands underneath the charges to give them some height and our white IKEA tray. Even after all the crazy good finds I just mentioned, I think the best of the best (of the best) came from a wee tiny yard sale that we just happened upon, as most yard sale finds do. As we sped by it, I spied with my little eye a small brass birdcage. Price… $1 American. You damn right…
For the star of the table, I had envisioned buying this Peacock from www.save-on-crafts.com. But after accompanying Heather to Charlotte, NC to deliver a cupcake order, she asked if I had ever been to a Garden Ridge store. I think my response was something like this…“A what?” She “claimed” that I would love it, and mind you she claims a lot of things. Refreshingly for a change, she was right. (Heather here, this make me LOL. I am right about these things most of the time, but I will leave this bit in here for the entertainment of you ladies out there who know how men can be…) We ended up browsing for almost two hours and purchasing ornaments, sprays, and birds for both Heather’s Cardinal & Birch table, as well as the bird for my Gold & Teal Peacock table.
 For the printables, I had discussed a certain type of look I was going for with Heather. Specifically I had wanted to incorporate the silhouette of a Peacock’s head and accompanying plumes on top, and stick it inside the general shape of a gilded birdcage. After doing some rough sketches on my idea pad, I sat down with Heather to bang something out in Adobe’s Illustrator program. As you can see, we make a great team, as she was able to take my idea and translate it into a great set of party printables. (Our printables are available in our Etsy shop here.) When we had most of the major design elements finished we set out to find a font suitable for even the most discerning Peafowl. I had suggested to use Riesling, since I took one look at it and thought it was very Gatsby-esque, and would just totally jive with my look. We think our glitzy and glamorous take on the whole Peacock theme turned out stunning, and if you agree please let us know by leaving a comment, or even just saying so on our Facebook page!
Come back for Part Two of this post later in the week, where Ms. Heather will dish on the delish! (HA! See what I did there?)
Sneak Peek! Birds of a Feather: Retro 20's Style Glam Peacock
Introducing a little sneak peek at our second holiday table for the season. In continuation with our Birds of a Feather theme, this one is all about the glam, glitz and retro 20's feel with a very proud peacock taking center stage. Check back soon for the full write up, tons of eye candy and tips galore on creating this look for your holiday festivities!

"You can't keep me cooped up in here. I am a peacock! You've got to let me fly!"
Just a little clip from the movie The Other Guys, the only funny peacock reference we could find :)
Holiday Baking Recipes & Our Cardinal and Birch Dessert Party Table
Good morning holiday bakers! As promised we are posting the three recipes from our Cardinal Red & Birch Bark Holiday Dessert Table this morning for you all bake to your hearts content. Today is Saturday and there is no time like the present to whip up a few tasty treats!
Each of these recipes are simple to do and would make a wonderful gift for someone on your holiday shopping list! The Hot Chocolate Sticks in particular keep for quite a while and would be perfect for your co-workers, neighbors and friends!

Hot Chocolate on a Stick
recipe via Whipperberry Blog
Chocolate Ganache Squares
- 1/2 cup of heavy cream
- 14 oz. can of sweetened condensed milk
- 3 cups of semisweet chocolate chips
- 1 teaspoon vanilla {or any other flavoring that you would like}
Directions:
- Using a double boiler, (use a heat-safe bowl on top of a sauce pan) place 2-3 inches of water in the sauce pan. Bring to a low boil and then turn down to low. Place bowl on top of sauce pan.
- Heat the cream and the sweetened condensed milk in the bowl of the double boiler. Once warm add the chocolate and gently melt.
- After about 10 minutes, whisk mixture until thick and smooth.
- Add vanilla or the flavoring of your choice. Whisk in the flavoring and pour into a parchment or foil lined 8x8 in. dish. Let sit overnight to slowly set up.
- Once set, turn out onto a clean surface and cut into 1 inch cubes or use a small circle cookie cutter to cut into rounds. {Note: it’s best to heat knife in hot water and wipe clean with each cut.} This is wonderful as is, but pair it will a fluffy homemade marshmallow and melt it into 4-8 ounces of warm milk…it’s divine!!
Handcrafted Marshmallows
- 3 packages of unflavored gelatin
- 1 cup of ice cold water (divided)
- 1 1/2 cups of granulated sugar
- 1 cup of light corn syrup
- 1/4 teaspoon of salt
- 1 teaspoon of vanilla extract
- 1 cup of powdered sugar
- 1 cup of cornstarch
- non-stick spray
Directions:
- Place gelatin into the bowl of a stand mixer along with 1/2 cup of the water. Have the whisk attachment close by.
- In a small saucepan combine the remaining 1/2 cup water, granulated sugar, corn syrup and salt. Place over medium high heat, cover, and allow to cook for 3 to 4 minutes.
- Uncover, clip a candy thermometer onto the side of the pan, and continue to cook until the mixture reaches 240 degrees F, approximately 7 to 8 minutes.
- Once the mixture reaches temperature, immediately remove from heat.
- Turn the mixer on low speed and, while running, slowly pour the sugar syrup down the side of the bowl into the gelatin mixture. Once you have added all of the syrup, increase the speed to high.
- Continue to whip until the mixture becomes very thick and is lukewarm, approximately 12 to 15 minutes.
- Add the vanilla (or other flavoring or coloring) during the last minute of whipping.
While the mixture is whipping prepare the pan as follows:
- Combine the confectioners’ sugar and cornstarch in a small bowl. Lightly spray a 13 by 9-inch metal baking pan with nonstick cooking spray. Add the sugar and cornstarch mixture and move around to completely coat the bottom and sides of the pan.
- Return the remaining mixture to the bowl for later use.
- When ready, pour the mixture into the prepared pan, using a lightly oiled spatula for spreading evenly.
- Dust the top with enough of the remaining sugar and cornstarch mixture to lightly cover. Reserve the rest for later.
- Allow the marshmallows to sit uncovered for at least 4 hours and up to overnight.
- Turn the marshmallows out onto a cutting board and cut into 1-inch squares using a pizza wheel dusted with the confectioners’ sugar mixture.
Assembly:
- Once your ganache and marshmallows are set and cut into squares, place a ganache block on the bottom, a marshmallow on top, then skewer with a stick.
- Wrap the sticks up with cellophane and store them in an air-tight container until ready to use.
- If you plan to give them as gifts, you can use cellophane treat bags to wrap, then secure them with a ribbon or bakers twine and a festive holiday gift tag.
- Our sticks lasted almost two weeks sealed in a container.
Usage:
To make your hot chocolate, heat your milk in a mug until it reaches a steaming temperature. Place a stick into the milk and let it sit for approx. 5 minutes. Stir with the stick until the marshmallow is frothy and the chocolate is completely mixed. Drink and enjoy :)

Raspberry Linzer Cookies
You will need:
- One recipe Sugar Cookies, baked.
- One jar Raspberry Preserves
- Sifting Sugar
- Round biscuit/cookie cutter and a smaller shaped cookie cutter for the hole in the center.
Sugar Cookies
recipe via Martha Stewart
- 2 cups all-purpose flour
- 1/4 teaspoon salt
- 1/2 teaspoon baking powder
- 1/2 cup (1 stick) unsalted butter
- 1 cup sugar
- 1 large egg, lightly beaten
- 2 tablespoons brandy, or milk
- 1/2 teaspoon pure vanilla extract
Directions:
- Whisk together flour, salt, and baking powder in a medium bowl; set aside.
- In the bowl of an electric mixer fitted with the paddle attachment, cream butter and sugar; mix until light and fluffy.
- With mixer running, add egg, brandy, and vanilla; mix until well combined.
- With the mixer on low, slowly add reserved flour mixture. Mix until just combined.
- Transfer dough to a work surface. Shape into 2 discs, cover with plastic wrap, and refrigerate for at least 1 hour.
- Preheat oven to 350 degrees. Line baking sheets with nonstick baking mats or parchment paper; set aside.
- On a lightly floured work surface, roll out dough to 1/8-inch thickness.Cut into desired shapes.
- For the linzer cookies you will need both top and bottom cookies to sandwich together, your top cookie should also have a small shape cut out of the center. It is easier to do this step once you have transferred your cookies to the baking sheet.
- Transfer to prepared baking sheets, leaving an inch in between. Leftover dough can be rolled and cut once more. Bake until lightly golden, about 10 minutes; do not allow to brown. Transfer to wire racks to cool.
Cookie Assembly:
- Once the cookies are cool, take a bottom cookie and flip it so that the rough side is facing upwards. Spread the raspberry jam onto this side of the cookie and set aside. Do this for all the bottom halves.
- Place all of the top cookie halves onto a baking sheet by themselves. Dust with powdered sugar until the tops are lightly coated and white.
- Carefully place a top half cookie onto a bottom half cookie, being careful not to smudge your sugar dusting, and twist slightly to secure them together.
- Due to the moist jam inside the cookie, these should be eaten within two days. Otherwise they may become a bit soft and fall apart.

Snowflake (Coconut) Cake
You will need:
Duncan Hines Butter Recipe Cake Mix, baked.
Duncan Hines Homestyle Vanilla Frosting (x2)
Coconut Cream Filling, prepared.
Angel Flake Sweetened Coconut
Recipe for Coconut Cream Filling
recipe via Martha Stewart
- 6 large egg yolks
- 3/4 cup sugar
- 6 tablespoons cornstarch
- 1/8 teaspoon salt
- 3 cups milk
- 4 ounces (1 1/2 cups) sweetened angel-flake coconut
- 1 1/2 teaspoons pure vanilla extract
- Unsalted butter, for wrap
Directions for Coconut Cream Filling:
- Place egg yolks in a large bowl; whisk to combine; set bowl aside.
- Combine sugar, cornstarch, and salt in a saucepan. Gradually whisk in milk. Cook, stirring, over medium heat until mixture thickens and comes to a boil, 10 to 12 minutes. Remove from heat.
- Whisk 1/2 cup hot milk mixture into the reserved egg yolks to temper. Slowly pour warm yolks into the saucepan, stirring constantly. Cook slowly, stirring, over medium-low heat, until mixture begins to bubble, 5 to 6 minutes. Remove from heat. Stir in coconut and vanilla.
- Transfer filling to a medium mixing bowl. Lightly butter a piece of plastic wrap, and lay it directly on top of filling to prevent a skin from forming. Chill until firm, at least 1 hour.
Recipe for Cake & Assembly
- Heat the oven to 350 degrees. Arrange two racks in the center of the oven. Line the bottom of three 6-by-2-inch buttered round cake pans with parchment paper. Dust the bottom and the sides of the cake pans with flour, and tap out any excess.
- Prepare Duncan Hines Butter Recipe cake mix as directed.
- Divide the batter between the prepared cake pans. Bake until a cake tester inserted into the center of each cake comes out clean, rotating the pans in the oven, if needed, for even browning. Transfer cake pans to wire racks to cool, about 15 minutes. Remove cakes from pans, and let cool completely on racks, tops up.
- To assemble, remove parchment paper from the bottoms of cakes. Split each layer in half horizontally with a serrated knife. Set aside the prettiest dome; it will be used for the final layer. Place another domed layer, dome side down, on the serving platter. Sprinkle 2 to 3 tablespoons of flaked coconut over the cake. Spread a generous 1/2 cup coconut-cream filling over coconut flakes. Repeat sprinkling and spreading process on the remaining layers until all but the reserved domed layer are used. Top cake with the reserved domed layer. Transfer cake to the refrigerator to firm for 1 hour.
- Remove from the refrigerator, and frost the outside of cake with frosting. Sprinkle remaining coconut flakes all over cake while frosting is soft; do not refrigerate. Cake can be left out at room temperature for several days.