Sweet Ideas: Bumblebee, Honey Comb & Bee Hive Cupcakes


We have seen so many cuter than cute parties featuring yellow, bumble bees, honey, and bee hives that we thought we would share a few photos and a recipe for two of our favorite cupcakes.

This recipe is for a Banana Cake topped with Honey Buttercream and finished with a Hive Comb Sugar Cookie or just a simple Bumblebee.

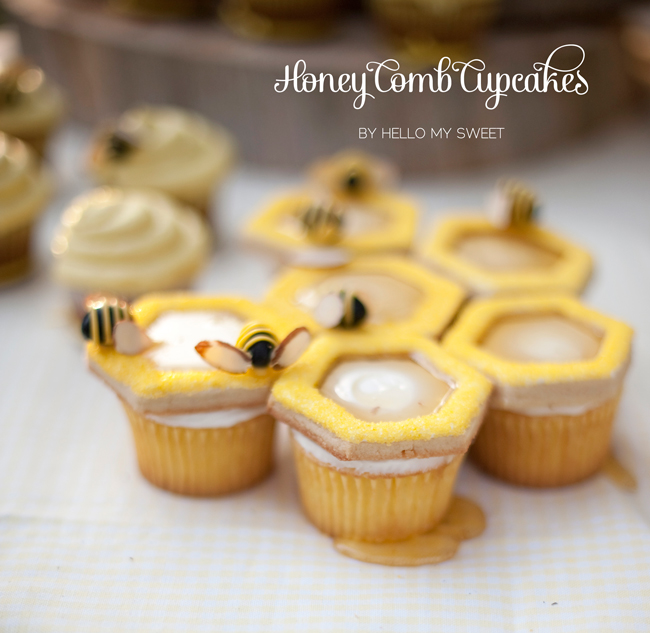
Let me first say, this is one of our favorite recipes. Banana cake is very sweet, but not overly sweet. It is more like a muffin, only topped with frosting. I have personally consumed many of these for breakfast. The combination of banana cake with honey - cinnamon frosting is perfect.

Banana Cupcakes

Ingredients

  • 1 1/2 cups all-purpose flour
  • 3/4 cup sugar
  • 1 teaspoon baking powder
  • 1/2 teaspoon baking soda
  • 1/4 teaspoon salt
  • 1/2 cup (1 stick) unsalted butter, melted
  • 1 1/2 cups mashed bananas (about 4 ripe bananas)
  • 2 large eggs
  • 1/2 teaspoon pure vanilla extract
  • Honey-Cinnamon Frosting (recipe below)

Directions

  1. Preheat oven to 350 degrees. Line a standard 12-cup muffin pan with paper liners. In a medium bowl, whisk together flour, sugar, baking powder, baking soda, and salt.
  2. Make a well in center of flour mixture. In well, mix together butter, mashed bananas, eggs, and vanilla. Stir to incorporate flour mixture (do not overmix). Dividing evenly, spoon batter into muffin cups.
  3. Bake until a toothpick inserted in center of a cupcake comes out clean, 25 to 30 minutes. Remove cupcakes from pan; cool completely on a wire rack. Top with Honey-Cinnamon Buttercream. 

Honey Cinnamon Buttercream

Ingredients

  • 1 1/4 cup confectioners’ sugar
  • 1/2 cup (1 stick) unsalted butter, room temperature
  • 1 tablespoon honey
  • 1/8 teaspoon ground cinnamon

Directions

  1. In a medium bowl, using an electric mixer, beat confectioners’ sugar, unsalted butter, honey, and ground cinnamon until smooth, 4 to 5 minutes.

Sugar Cookie Honey Comb Shapes

Ingredients

  •  2 cups all-purpose flour
  • 1/4 teaspoon salt
  • 1/2 teaspoon baking powder
  • 1/2 cup (1 stick) unsalted butter
  • 1 cup sugar
  • 1 large egg, lightly beaten
  • 2 tablespoons brandy, or milk
  • 1/2 teaspoon pure vanilla extract
  • Light Corn Syrup
  • Yello Sanding Sugar

Directions

  1. Whisk together flour, salt, and baking powder in a medium bowl; set aside. In the bowl of an electric mixer fitted with the paddle attachment, cream butter and sugar; mix until light and fluffy. With mixer running, add egg, brandy, and vanilla; mix until well combined. With the mixer on low, slowly add reserved flour mixture. Mix until just combined.
  2. Transfer dough to a work surface. Shape into 2 discs, cover with plastic wrap, and refrigerate for at least 1 hour.
  3. Preheat oven to 350 degrees. Line baking sheets with nonstick baking mats or parchment paper; set aside.
  4. On a lightly floured work surface, roll out dough to 1/8-inch thickness. Cut into desired shapes, and transfer to prepared baking sheets, leaving an inch in between. Leftover dough can be rolled and cut once more. Bake until lightly golden, about 10 minutes; do not allow to brown. Transfer to wire racks to cool.
  5. Brush with a light coating of corn syrup and dust with yellow sanding sugar to complete the look.


Decorating Suggestions

Bee Hive Cupcakes: Pipe frosting using a large round tip. You can be as creative as you want here, doing just a few fat rings, or going really tall with several more. 

Honey Comb Cupcakes: Ice cupcakes with a spatula, then affix your sugar cookie shape on top, filling the center with fresh honey to finish.

Bumblebees: Create edible bumblebees to add to your frosted cupcake by combining large black jelly beans, almond slices and yellow tinted icing. (You can use store bought, or leftover honey buttercream.)


  • Starting with your jelly beans, secure an almond slice to each side of each bean with dots of icing. You may find it helpful to let the almond slices set in the refrigerator for about 30 minutes before attempting to proceed.
  • Then stripe your yellowicing across in a zig-zag pattern using a sandwich baggie with  a very small hole snipped off the corner. Refrigerate again to harden icing.
  • Nestle your bees onto the frosted cupcakes.


Sweet Disasters: The Time I Made Cupcakes (and they looked like poop)

Not so long ago I read an article regarding the merits of showing oneself as is. Meaning, not just the good and awesome, but the not so good and awesome as well. The point of this particular blog post was to illustrate how far bloggers go these days to make everything look perfect. We here at Hello My Sweet are guilty of this.

Jason and I try really hard to make our photos look perfect for when they hit the blog. So hard in fact, that when I realized that something has gone very wrong recently, I procrastinated the photo editing process for a long time, just so I didn’t have to be smacked in the face with my error. Putting this party off for as long as possible, was a subconcious effort however, and only after Jason asked me, “Are you unhappy with the way the party turned out? Why haven’t you edited the photos for it yet? You usually do not wait so long”  did I realize what I was doing. The poor man was feeling like he had messed up, because I hadn’t yet done my job. The part where I stare at the photos I have taken (over exposed, underexposed, blurry, you name it) and try to make them perfect in photoshop and ready for our blog.

You see folks, my error came in the cupcake decorating process this time. We made Milky Way cupcakes for a Retro Rockets & Rayguns space themed dessert table. Milky Way cupcakes consist of chocolate cake, with a milky way candy baked inside and topped with whipped chocolate buttercream and caramel drizzle. Sounds good right? Well leave it to me to make the delicious into the opposite. I baked the cupcakes, let them cool and commenced to decorating them with the buttercream. Everything was going according to plan, we were right on schedule. Only it wasn’t going well at all and I didn’t even realize it. I had chosen a wide round piping tip for the buttercream frosting process. I chose this because I wanted to keep it simple. This of course resulted in a fat swirl of chocolate buttercream. See where I’m going with this? Well I didn’t see it.

We placed them on the table and away I went taking photos. Fast forward 2 hours while I’m reveiwing the shoot on the computer monitor and BAM! It smacks me in the face. The cupcakes look like poop. And not poop in the metaphorical slang term sense, they are ugly. Oh no, no, no. Actual poop. A perfect brown swirl of chocolate buttercream “poop” on each and every one. I tried to tell myself it would be ok. But the more I looked at them, the more I saw just “poop.”

So this is just my little confessional today. I know I am not perfect. And most of you probably know it too. But in case you were in the mindset today of, “does this kind of stuff only happen to me?” I’m here to tell you, “Heck NO!” It happens to me too. And Jason. And everyone else. I bet even Amy Atlas has had her fair share of uh-oh moments.

But if you take nothing else away from this little decorating lesson today, just remember this:

Never use a round tip to pipe chocolate frosting onto a cupcake. EVER.


So tell us, what was your funniest baking or decorating disaster? We’d love to hear it; leave us a comment up top!

Sneak Peek! Birds of a Feather: Retro 20's Style Glam Peacock

Introducing a little sneak peek at our second holiday table for the season. In continuation with our Birds of a Feather theme, this one is all about the glam, glitz and retro 20's feel with a very proud peacock taking center stage. Check back soon for the full write up, tons of eye candy and tips galore on creating this look for your holiday festivities!


 "You can't keep me cooped up in here. I am a peacock! You've got to let me fly!"

Just a little clip from the movie The Other Guys, the only funny peacock reference we could find :)


Featured on Adorned

We discovered a feature post about our cupcake photos on the blogsite Adorned this evening. Thank you so much for visiting us Mackenzie! We love your blog design, so clean and fresh!

Here is a little blurb on what Mackenzie's blog Adorned is all about:

"Hello, my name is Mackenzie...This blog is my little labour of love. Born from the idea of creating a catalogue of all the beautiful items and images I stumble upon, this forum has become a welcomed outlet for me to share my inspirations and fascinations with others.  I am so grateful for the opportunity to contribute to a growing online community of creative minds and to be given the opportunity to share my thoughts with all of you on a daily basis.  Currently working as a freelance interior designer, I continue to dabble in both graphic design and photography.  I adore fresh cut flowers, white washed rooms and the colour pink.  In all that I do, I have a love for the handmade and a passion for the art of creating."