Today’s DIY project and tutorial is so easy it is going to blow your mind. That is if the cost of today’s DIY project and tutorial doesn’t first! We are going to show you how to assemble these super fun and creative Space Helmet Candy Dishes that were featured on our Retro Space Dessert Table last week. If you happened to miss that post you are going to want to click that little link up there in the previous sentence and check it out. Jason really out-did him self with the creative ideas this time!
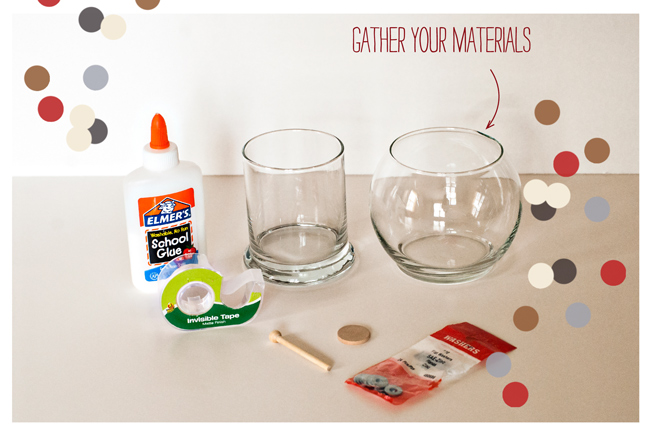
First things first, let’s talk about cost. Above you will see all of the materials used for this project. The Glass candle holders, (yes they are candle vessels) were found at Dollar Tree, so that is $2 bucks for the main part of the candy dish. The next part is optional and completely customizable. So you could quite literally not spend any more money at this point.
We used some simple wooden craft pieces and metal washers to create a “retro antenna” for the top of the “space helmet”. You can skip that step if you want, or you may find some other bits and pieces you like to use better. Ours was a mish-mash of found objects that combined into pure awesome. If you were to purchase those bits and bobs though, you would only be spending just a few bucks. We also chose to paint our antenna with some gold spray paint we already had on hand. Again, your choice, decorate however you see fit!
Here is the official material list as we completed the project:
Glass containers, one Cylindrical, one Globe - make sure to test them out before you bring them home to see if they fit easily together and apart.
Wooden Pieces - one for antenna, one for base - our antenna had a ball already attached at one end
Small Washers - make sure these fit onto your wooden antenna piece
Tape
Glue - Craft, Hot, Super
Spray Paint (or craft paint and applicator)
Step One: Like we mentioned in the material list, you want to make sure your two glass pieces fit nicely together without being too snug to fit together/apart. We recommend testing this BEFORE you bring them home :)
Step Two: If your washers weren’t quite the perfect fit for your wooden antenna piece, you will need to add a bit of cushioning to make them fit snugly around. We used tape and wrapped it around to make things fit nicely together. Thread your washers on, then spread your glue in between and around so that they are sure to stay put. Let this dry before you move on. When your antenna is ready, go ahead and glue it to the small wooden circle, and again let dry before moving on. We used Elmer’s glue but in hindsight super glue might have been easier, we’ll let you decide!
Step Three: Decorate it! As we said above, we sprayed our antenna with gold spray paint and let it dry. You could just as easily use a metallic craft paint or even cover it in glitter if you want it to sparkle! Once your decoration method is dry, it is time to attach the antenna to the helmet top. The helmet top of course is the bottom of the glass globe. We used hot glue to do this because we wanted to make sure our efforts were temporary and that we would be able to re-use the glass pieces again in the future. Hot Glue doesn’t bond well to glass and usually pops right off with the tiniest of force, so if you want your more permanent you may need a stronger adhesive.
And there you have it! A super duper inexpensive and easy way to transform some very plain jane glass containers into something a lot more interesting for your party!
If you have any questions or suggestions regarding this tutorial please do not hesitate to leave us a comment below!
Wikipedia defines “Retro-Futurism” as a trend in the creative arts showing the influence of depictions of the future produced prior to about 1960. Basically this coincides around the same time that The United States stopped dreaming about the future, IMO. This extremely eloquent individual seems to agree with that sentiment as well…
I apologize to all our of readers if this might be coming off as a rant about ideologies, and it’s not, just the opinion of someone who still dreams big, but politics and reality keep getting in the way and won’t stop being annoying! Breathe…In through your nose, out through your mouth…3 seconds in, 3 seconds out.
Okay I have successfully “enhanced my calm” (+1 Internets to anyone who leaves a comment on what movie that quote is from). I’m going to channel my quasi-negative energies into this blog post and the resulting awesome retro-futuristic themed dessert table that will unfold before your very eyes. It does, however, still bug the crap out of me that we as a species STILL don’t have personal rocket packs. Don’t even get me started on the flying car. Alas, it was not meant to be…
I have to admit, I was really super excited about designing this table, so much in fact that I started to build props of rocket packs and intergalactic rocket ships before I had even finalized the design of the table. It’s like the inner kid in me came out and didn’t want to go back to adult land and actually start to shape this table into a cohesive look.
After gazing upon our dessert table it’s my hope that it too will let your mind wander off and you inner child come out to play, soaring through the cosmos to dispatch evil robot villains with our rayguns, even if just for a little bit! ‘Cause if the world needs anything, it’s a little more dreaming…
So after watching the 1980 Dino De Laurentiis rendition of Flash Gordon and another cult classic, 1956’s Forbidden Planet, I had plenty of ideas just swirling around my noggin. I decided upon a more retro look akin to When Worlds Collide, after a disastrous accident with the first version of my rocket ship prop/centerpiece.
As I said earlier I had finished it so early that it was just perched precariously atop our refrigerator and met with untimely death on our kitchen floor. After ditching the Flash Gordon-esque look, I eventually went with more of a traditional rocket look.
Two other props that I had done for our table, a space helmet and a rocket pack, are actually wearable items that kids can use to “fly” around the room and burn off a little of that energy! We will be posting a D.I.Y. in the coming weeks on how we made these items, but suffice it to say you can work some crafting magic with just 1 liter soda bottles, paper cups, a package of elastic banding, an Utz cheese ball container, hot glue and some spray paint.
On one of our countless trips to Lowe’s we also stumbled upon a K-Cup container/carousel thingy (I apologize I don’t know what else to call it) that I knew I just had to have for THIS table. It looked straight outta the 1960’s, with its “futuristic” design and chrome finish.
From Dollar Tree’s candle holder section, three fishbowl shaped candle holders and three cylindrical shaped votive holders. When you combine these two different shaped candle holders together, just by putting the fishbowl shaped ones over top of the cylindrical holders, you now have a candy/snack container shaped like a space helmet! The fishbowl shaped holder just lifts off (no pun intended!) to expose the goodies inside the other candle holder. Not to toot my own horn, but…INGENIOUS! I even added a few details to the top of the spherical candle holders to tie in the look of them with the large space helmet made out of the Utz cheese ball container.
Several other purchases that also came from Dollar Tree; 2 packages of water guns that were spitting images of the old fashioned “Ray Guns.” I just used some fine grit sanding paper to scuff up the surface, masked off a few areas and painted them to match the other props on the table. Lastly we ended up purchasing 2 packs of inexpensive paper plates, one pack of white, and another of black. I then cut a crescent shape out of the white plate and used double sided tape to adhere it to the whole, uncut, black plate. A small and easy D.I.Y. that adds extra atmosphere (“atmosphere”…see what I did there?) to the whole setup!
Another idea I wanted to implement was for the beverages on our table. Specifically I knew I wanted it to be a two-step interactive process that kids (of all ages) would enjoy. Anytime you can get your party guests involved in the party they are at, instead of just being in attendance, you are winning. And although the combination process doesn’t actually involve any actual science, it’s just Mio Liquid Water Enhancer and club soda, you could integrate that into your own party setup. One container would have the “fuel”, or a small amount of Mio flavored club soda, and would be added to another container, the “tank”, that would house the clear club soda. We had on hand from previous holidays, some Wilton containers of sugar sprinkles that oddly looked like test tubes. I just dumped out the sprinkles into some Tupperware, and cleaned them out. After looking at the empty test tubes, and by “looking” I really mean staring. And by “staring” I really meant to say zoning out. Then it hit me! These things look like the “fuel cores” used in another favorite sci-fi movie, The Fifth Element. I know it’s not really in the realm of “retro” but hey it works for this idea…just go with it. Then all I needed was my “fuel tank,” and remembered a bottled water brand by the name of VOSS that had some really nifty looking bottles.
There was just one teensy problem. I could not find these damn bottles at any of our local grocery or convenience stores. That is, until I took a trip to my mother’s house in northern Virginia and my son and I had to stop at a Sheetz to gas up. While there we decided, and by “we decided” I mean my son needed yet another snack, to go inside and there they sat. It’s like the final piece of the puzzle had clicked into place, I now had my fuel tanks. I purchased 8 of them right on the spot, rather difficult considering I had 8 bottles of water in my hand, along with my son’s food, and let us not forget the toddler that does NOT want to stay by my side during the check out process. Sigh…I’m fairly certain I got some odd looks, but totally worth it. Just check out our snazzy animated GIF and we’ll let you decide if it’s totally cool or not.
Having an Etsy store ourselves, we are always appreciative of the purchases of our customers, so we try to “pay it back” to the community by purchasing from other Etsy stores. We came across this store that was offering a “three compartment stainless steel tray” that bore more than a passing resemblance to the Martian eye-probe from the 1953 War of the Worlds sci-fi movie. After realizing this, I just had to have it as well.
On all these really cool plates, trays and containers sat our goodies. They ranged from bite-sized treats consisting of “Lunar Bits” or Hershey’s Cookies’n’Crème drops, “Meteorites” or Milk Chocolate Rocks from Wal-Mart, “The Original Atomic Fireballs” or really effing hot balls of fire in your mouth, to “Food Pills” or Good & Plenty’s. Because you know, in the future all your food will come in pill form… We also had some larger desserts such as “Moon Pies”, Vanilla and Banana flavored, “Star Crunch”, “Black Hole” or chocolate donut gems, “Dark Matter Pops” or Devils Food Jell-O pudding pops, and Milky Way cupcakes. Party guests washed it all down with “Reactor Cores” and “Rocket Fuel” or Mio Flavored club soda.
As far as the printables go, I just want to state that you can derive inspiration from the strangest of places or things. At some point in time someone had gotten me some article of clothing from UNIONBAY. It came with a tag, that with a little tweaking, I thought would look great on our table. Modify the overall shape slightly and keep the orientation, change the colors, throw in some retro sci-fi elements and voilà. Hopefully an instant classic with customers over at our Etsy store.
The large menu, something we at Hello My Sweet started to do with our Rainbows and Candyland party, uses a bold retro stellar cartography map as it’s backdrop and lists the food items in such a way that the names appear to be blasting off into the void of space!
I wanted to have a bit of fun with the invitation and model it after a mash-up of an old timey telegram message, with the “stops” or breaks, and receipt of orders from HQ. The “Thank You” card included in our set is also a break from the norm in that it replicates receiving an award or plaque for your attendance.
Again it is our hope that everyone who sees this table will get some great ideas and inspiration, and of course dares to dream big regardless if they are 8 or 80.
We were very satisfied with the end results of the table, the décor, and of course the printables, but if anyone out there has any suggestions, praises or critiques please feel free to leave a comment in our comment section!